Project Summary: ProcVis
ProcVis (Proccessor Visualisor) was a project I undertook for my final year project whil at university.
The project was intended to help teach some parts computer architecture. I intended to do this by creating a way to visualise how the components of a processor interact, and the various stages involved in executing instructions.
Design

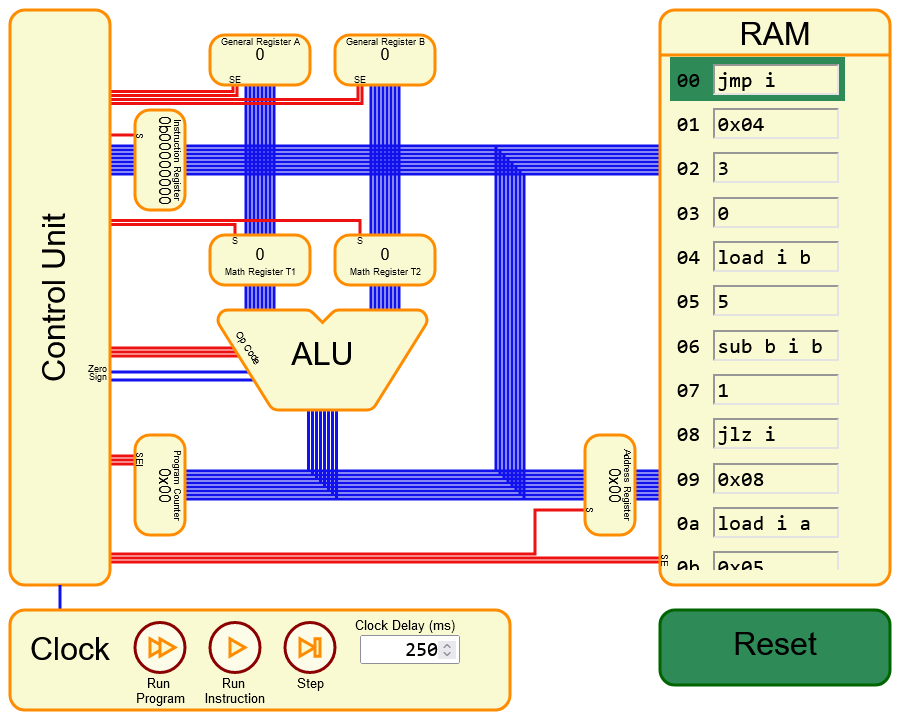
The processor (shown in Fig.1) is a simple 8 bit Von-Neumann design, consisting of:
- 2 general use registers (A & B),
- 2 additional registers for serving the ALU,
- A single instruction register,
- A single program counter register,
- A single address register,
- An Arithmetic & Logic Unit (ALU),
- A Control Unit,
- 256 bytes of programmable memory (RAM),
- A “clock” (serves as the user’s control for progressing the processor).
There are also various data busses on the processor:
- In blue we have the data busses
- The main data bus connects the RAM to the various registers. This bus has 8 lanes.
- There are two single land busses linking the ALU to the control unit. These hold the zero and sign flags for conditional jumps.
- Finally there are busses connection the math regsters to the ALU, the instruction register to the control unit, and the address register to the ram.
- Data busses connection registers directly to another component are always enabled.
- In red there are the command busses. These carry signals for
- Set (store the current value on the main bus),
- Enable (Write the current value to the main bus),
- and Increment (increase the stored value by 1).
- There are also three that carry an opcode to the ALU to tell it what instruction to execute.
This architecture was chosen to keep the structure simple enough that the diagram is not too overwhelming, while still representing all the normal components someone would exect.
Instruction Set
In keeping with the goal of making the system to understand, rather than using an existing 8 bit instruction set I designed my own. This was to keep is simple and limited only to the required instructions. The instruction set inculdes 6 arithmetic/logical operations, 2 memory operations, and 4 jump operations. Most of the instructions support both immediate and register addressing modes. Immediate addressing truns the instruction into an 16 bit instruction with the 2nd byte being the immediate data.
Usage
The processor canbe programmed by typing instructions into the ram. Each ram line contains a text box into which an instruction or data value can be entered.
Once programmed, the processor can be stepped either one micro operation or full instruction at a time, or left to run. While the process is running, or when stepping through operations, the busses that are bing activated will light up showing the values being carried by them. Other componenets will also change colour depending on if they are being enabled (read from) or set (written to).
In operation, a description of the current operation will be written on the control unit helping to understand why each stage is being done to achieve the execution. This also details the fetch execute cycle, explaining how the processor first fetches an instruction from memory then conrinues execution to execute said instruction.
If a user wishes to see how data is being stored they can cycle values in the registers or ram. For registers this is done by clicking on the register to cycle between decimal, hex, and binary views. For the ram this is done by clicking the line number; this shows the decimal, hex, and binary views, and the instruction if it was entered as text.
Outcomes
This project helped to solidify my understanding of various componenets of computer architecture. It also eneded up being an integral piece of my final year project allowing me to complete my degree with a 1st.
The feedback recived from users while doing my project was generally good, though a bit more coaching on how to use it was needed than initailly hoped. This was likely due to the time constraints in which I needed people to get familiar with using it, and a faliure on my part in structuring questions that would have aided with discoverability.
Overall I am very happy with how the project turned out, and in the future hope to be able to improve it further.
You can play with this project online here.